Help
Welcome to UltiStats, a new web-based app that allows you to quickly and easily keep stats for your team! This documentation should help users get started with and use the webapp. To contact the developer with bug reports or feature suggestions, use the contact form.
This page details the features of this app. Sections marked with a (➕) denote features that are only available with a Plus subscription.
Signing up
New users should sign up for an account here.
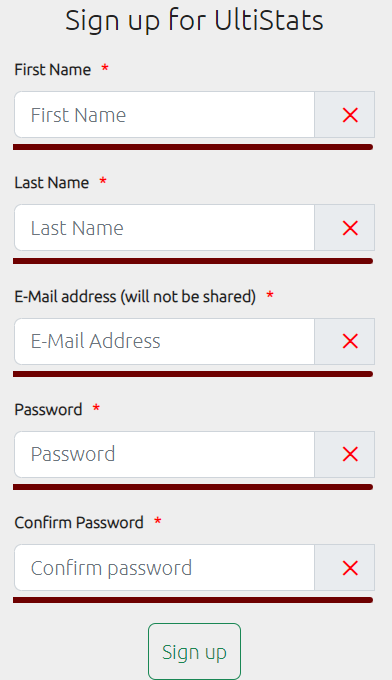
Signup form
Provide your name, e-mail, and set a password, and submit the form with the "Sign up" button. You will receive an e-mail from UltiStats at the address provided, with a link to confirm your e-mail address. Be sure to check your spam folder if the e-mail does not appear in your inbox within a few minutes. After clicking the link, you will be able to log in.
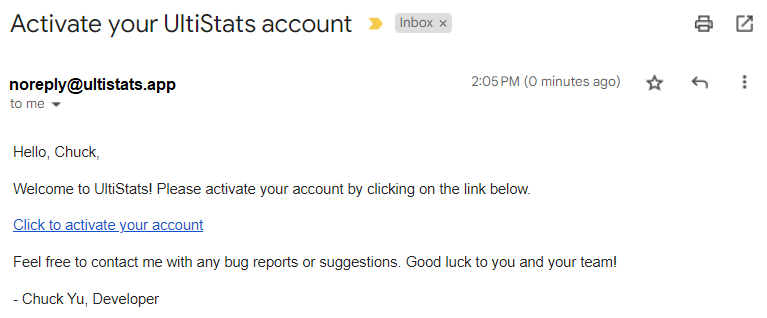
Confirmation e-mail
Logging in
Use this page to log in. If you forget your password, click here and follow the directions to reset it.
User profile
Your user profile is your basic information, including your name and e-mail.
You may also use this page to change your password, if you wish.
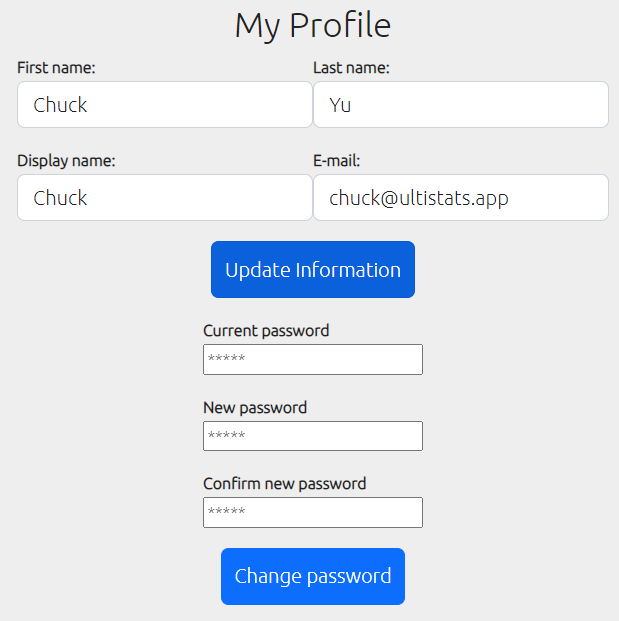
Your profile
Using the app
This app allows you to create teams, set rosters, and enter stats with just a few touches.
Teams
Creating a team
Team information
Select "Create New" from the team select dropdown (1), and fill in your team's information. All information may be edited later. Take special note of your team's colors - it is recommended that, for each jersey (dark and light), you pick colors that contrast well (e.g. don't pick gray for your light jersey, and a different shade of gray for your light numbers). When you enter games into the database, you will click buttons that look exactly like the jersey previews (3) below the color selectors.
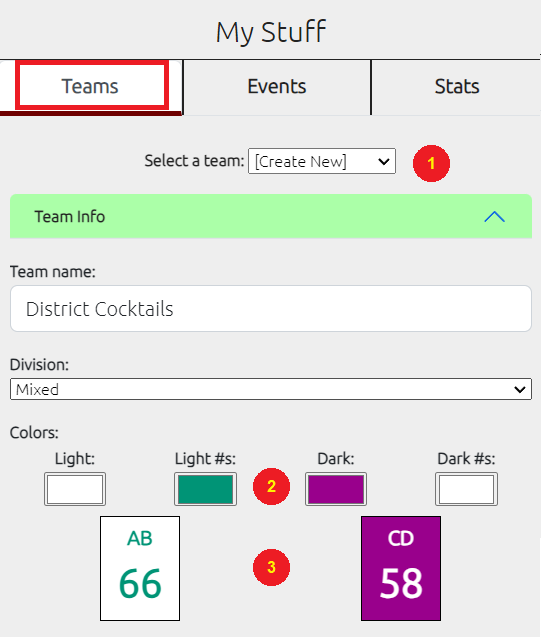
Team information
Setting a roster
This step is technically optional, but is highly recommended. Setting your roster allows you to quickly add players to a tournament roster. You may add or remove players at any time, and you may also add players for just a single tournament (which is covered here). Your team may have up to 50 active players at a time, which allows you to set your main roster along with any practice players you may take to a limited number of events over the course of your season.
Add players to your roster by clicking on the "Roster" section. Set each player's name, display name (e.g. nickname), jersey number, gender (for mixed division teams), primary line (offense/defense), and their position (handler/cutter/hybrid). Click "Add Player" to save the player to your roster. Players may be removed or edited at any time. Removed players may be reinstated by adding a player with the same name and number. You may add players with the same jersey number to your roster, but a warning will be given (as governing bodies tend to disallow duplicate numbers on a roster).

Adding a player to the roster
Players may be deleted or edited from the roster table after being added.
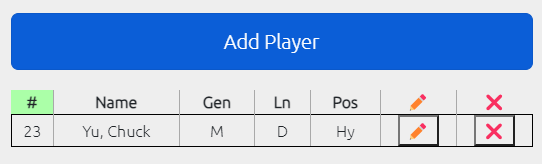
Roster table - click the ✏️ icon to edit a player or the ❌ icon to delete.
Editing a team
Team information may be edited in the same area as when creating a team. After creating a team, you may also add other users to manage the team, and edit your subscription level.
Adding managers
When you create a team, you are, by default, its only team manager. While anyone who has a specialized link (explained here) may view your team's stats, team managers also have the following abilities:
- Edit team information
- Invite other people to be team managers
- Edit the team roster
- Add and edit team events
- Enter team stats
In order to invite a user to be your team's manager, that person must first have an UltiStats account, which is free and easy to obtain here. After that, an existing team manager may request to add a manager by entering their e-mail address into the "Add Manager" field.

Add a manager
The requested manager should receive an e-mail to confirm or decline being added as a team manager. Additionally, incoming manager requests will show up in your profile page.
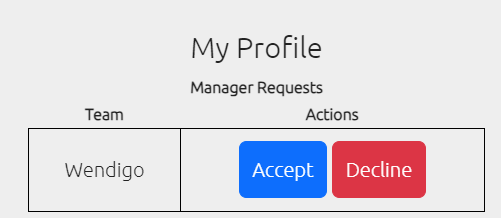
Team "Wendigo" has requested to add you to their list of managers.
Subscriptions
You may always use the basic features of UltiStats for free (but donations are appreciated). To access some more advanced statistics, and graphical reports, you must have a subscription, which is $20 per team per year. Each team you manage must have a separate subscription. To manage your subscription, go to the subscription section under "Teams" in my stuff.
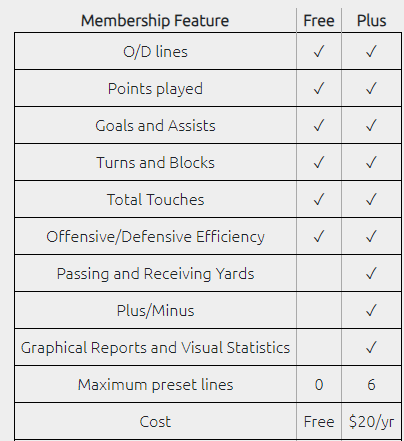
Subscription features
Free subscriptions include stats on points played, goals, assists, turns, blocks, touches, and efficiency.
A Plus subscription grants you access to the following features, along with all features in the free version:
- 6 preset lines per event - along with defaulting all players to offense or defense, you may preset 6 lines per event. Good for setting multiple O or D lines, or universe point lines for both offense and defense.
- Passing and receiving yards - track not only which players are touching the disc the most, but also which ones are making the most of their touches.
- Plus/Minus - which players, when on the field, are most correlated with the team scoring a point?
- Graphical reports - graphical reports of the individual and team performances. See where possessions tend to go, where turnovers are happening, what kind of passes players are attempting and completing (or not completing), and which pairs of players tend to throw to each other.
- ...and more - I am always open to suggestions for other reports and stats to include. Use the contact form to suggest something. I would like this web app to be useful to you and your team, but this is also a learning experience for me as a developer and a (poor) statistician.
Events
Normally, events are just individual tournaments, but you can create an event for just about any subset of your season, up to and including the entire thing. Want to keep stats on a scrimmage against your crosstown rivals? You can create an event for it, and just add a single game to it.
Each event is tied to a team. To create an event, select the "Events" tab from my stuff, select a team, and select "[Create new]" from the event selector.
Event information
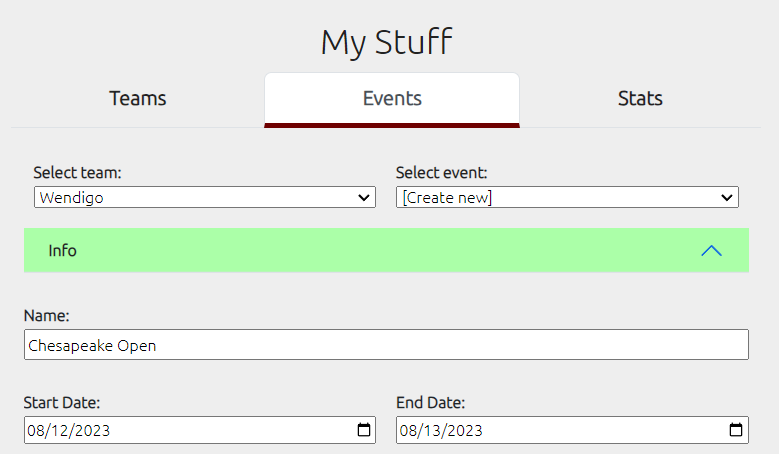
Event information
Populate the name and dates into the "Info" section. You must specify the event's name and dates.
Event rules
Set the rules of the event in the "Rules" section

Format - the format of the event. Currently, only USAU (70-yard field with 20-yard endzones) is supported. WFDF formats can be recorded with this setting as well. In the future, we will look to add the AUDL ruleset, which uses a larger field and allows points to end without a score (at the end of a quarter).
Game to - the point cap of the game. Default 15 for USAU events.
Win by - A game ends if the point cap is reached and the leading team is ahead by at least this many goals. Default is 1.
Hard cap - The hard cap of a game. The game ends if either team reaches this score, regardless of margin of victory. Disabled if "win by" is 1.
T/Os - the number of timeouts allowed. Default is 2/half in USAU events, but you may also set this to 1/game, 1/half, or 1/half + a floater.
Setting event rosters
You must set an event roster to record stats. This is not necessarily the same as your team's main roster (explained here). Your event roster can account for any players from your main roster that are not in attendance for this event. You may also add players to your main roster from this interface.
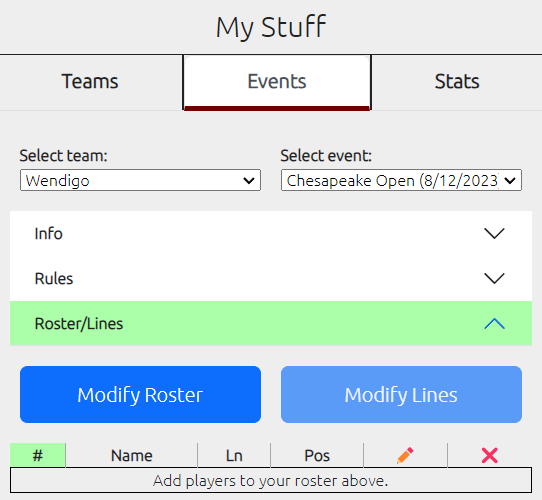
The event roster section
Click the "Modify Roster" button to add or remove players from your event roster.
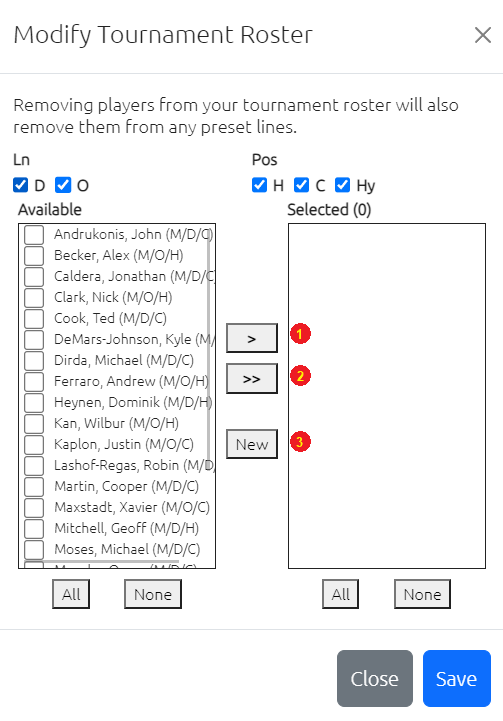
The event roster window
Click on the players to add (use the "All" and "None" buttons on either side to select or deselect all players from that side). Use the single arrow (1) to move toggle all checked players between the available and selected boxes. Use the double arrow to move all players in the direction indicated. Use the "New" button to add a new player to your roster. This player will be added both to the tournament roster and to your main roster. The "add player" interface is explained here.
Setting event lines (➕)
With a Plus subscription, setting event lines allows you to quickly set up points during the heat of a game. Instead of individually selecting seven players for each point, select a preset line and populate your lineup with as little as two clicks.
To create a preset line, click on "Modify Lines". Give your line a name, select players for that line, and click "save". It is recommended that, for mixed teams playing under the USAU or WFDF standard formats, preset lines contain 6 players - 3 male-matching and 3 female-matching. This way, the seventh player may be added manually on each point, depending on the presecribed gender ratio.

Creating a preset line
Adding games
Add games to an event using the "Games" section. Select a round, enter the opposing team's name, and set the game rules. Note that these will default to the event rules, but do not have to match exactly. This accounts for the fact that not every event has the same rules for every game. For example, pool play games may be played to 13 while the bracket is played to 15.
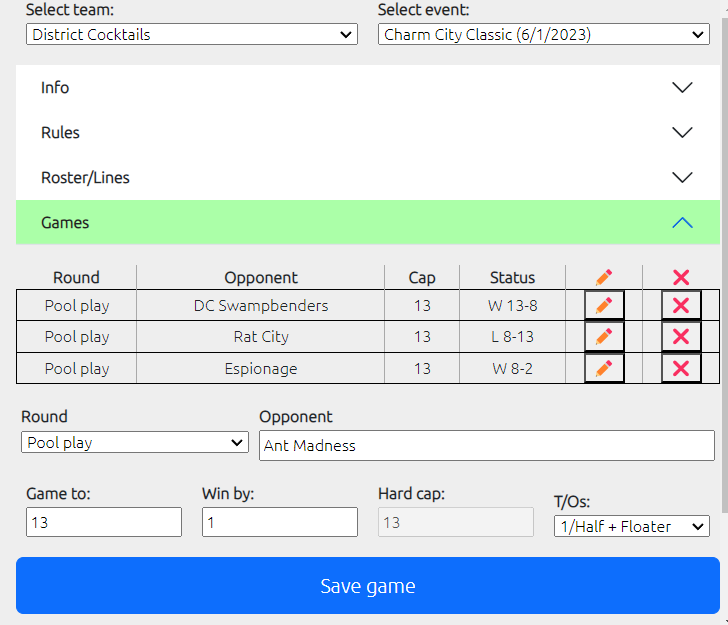
Adding a game to an event
After adding a game, use the pencil icon (1) to edit the game information, or the X icon to delete it. Click on the "Start" link (3) to start entering game stats.

Editing a game
Keeping game stats
Keeping game stats is a snap. Set up your game, set up each point, and then set the location of each pass. Click a button for events, including timeouts, injuries, any type of turnover, or goals.
At the start of a game, you will be prompted to enter the starting settings for the game - your jersey color (only determines the colors of the buttons), whether your team starts on offense or defense, the starting gender majority (if mixed division), and your starting direction.
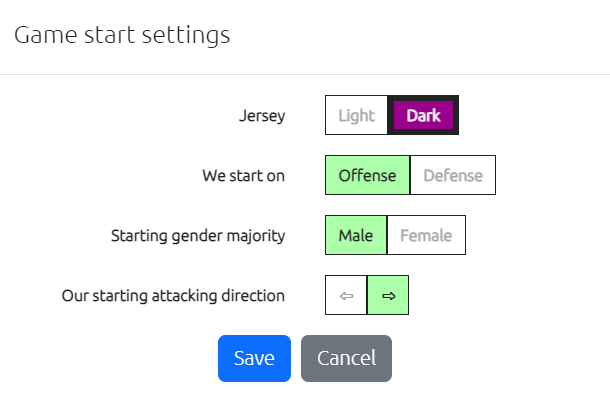
Game start settings
Setting up a point
Before starting a point, you must set it up. Click the "Setup point" button to set your lineup and verify the details of the point.
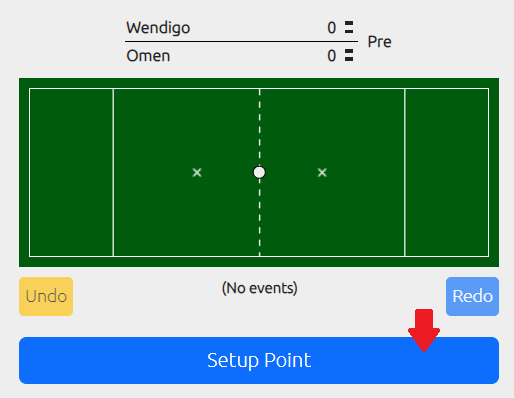
Setup point button
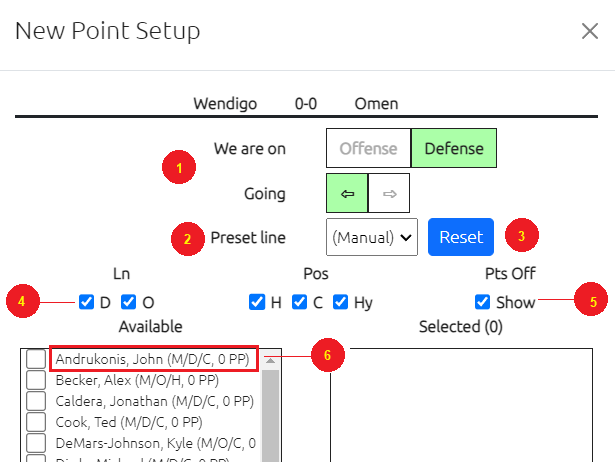
Point-setup interface
The point-setup interface has several key features.
- Verify whether you are on offense or defense, your direction of attack, and (mixed only) the gender ratio. The tool can usually figure out these things (based on whether you scored the last point, the previous gender ratios, and your previous direction) but you may manually override these settings if necessary (e.g. if your statkeeper decides to move to the other side of the field between points, your direction of attack might change). You may not change these settings once a point starts.
- Your preset line (➕) - You may autopopulate a preset line (described here) from this dropdown.
- Reset preset line (➕) - You may add or remove players, even after selecting a preset line. If you make a mistake, or want to reset your line to the preset line, click this button
- Filter players - Filter players based on their primary line (O/D) and position (Handler/Cutter/Hybrid).
- Points off - Check this to highlight any players who have sat for more than 5 points. Uncheck this to hide this information.
- Player information - Player name, gender, line, position, and points played. For example, (M/D/C, 5 PP) indicates that this player is a male defensive cutter who has played 5 points this game.
The interface and in-point events
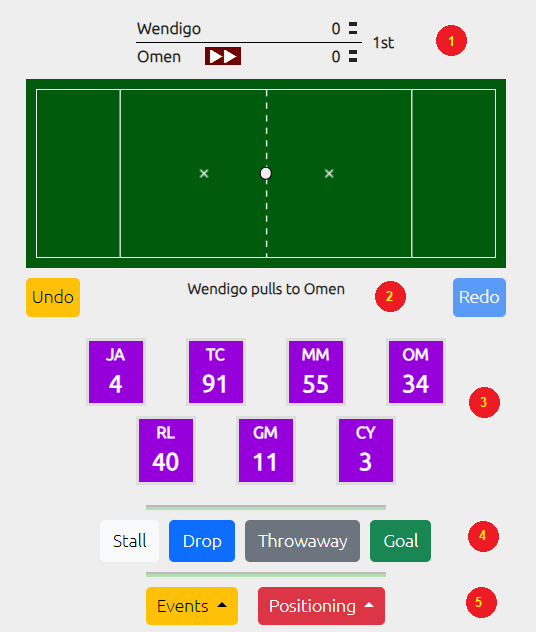
The data entry interface
- Scoreboard - displays the game score, who is currently on offense and their attacking direction, the game period, and how many timeouts each team has left.
- Field - used to indicate the location of events on the field.
- Event description - the last recorded event. At the beginning of a point, it simply indicates the pulling and receiving team, but when on offense, will also indicate the last completed pass.
- Players - each of these represents one of the players on the field.
- Pass results - use these buttons to indicate the result of a pass (if something other than a regular completed pass)
- Miscellaneous - use these menus for miscellaneous occurrences. The events menu contains timeouts and injuries. The positioning menu is used when the disc needs to move to a specific location, such as the brick mark, or the goal line.
In-point events
In-point events can be described using just a click or two, most of the time. Each event below can be indicated as by specifying the indicated information, in order. Refer to the list above for where to specify these pieces of information.
Defense
- Blocks - location on field, player. Note that, if your player catches the block, you must enter the event as a block followed by the same player picking up the disc (described below in the "Offense" section).
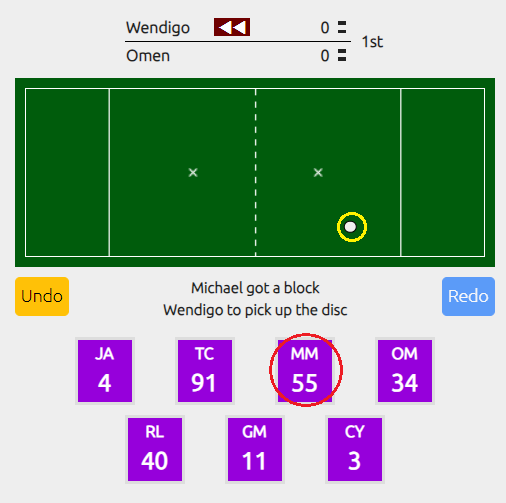
Indicating a block. Note that the possession arrow on the scoreboard has changed as a result.
- Turnovers - location on field, stall/drop/throwaway.
- Opposing goals - result
Offense
- Starting a possession - location on field, player catching pull/picking up disc
- Completed pass - location on the field, receiver. Entering a string of completed passes is thus very easy - simply touch the location, then the player, and repeat until something else happens.
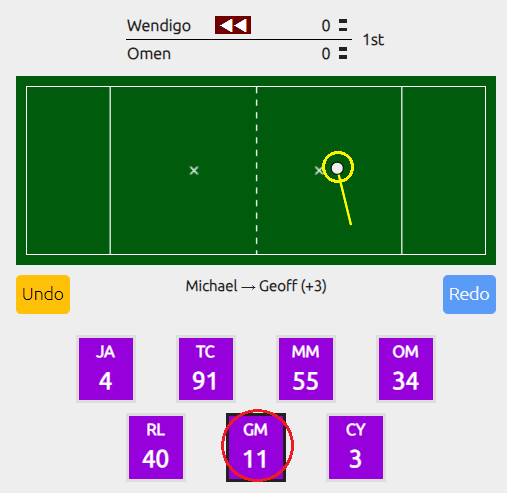
Completing a pass. The interface indicates where the pass came from and where it went, the thrower and receiver, and the yards gained or lost.
- Stall - stall button.
- Throwaway - location on field, result. Do not enter an intended receiver.
- Drop - location on field, intended receiver, result. Note that this will key in as a completed pass before you indicate that there was a drop. Also note that for some turnovers, you will have to decide whether it was a throwaway (thrower gets the blame) or a drop (receiver gets the blame). Only one player will have a turnover added to their stats.
- Goal - location on field, receiver, goal. Note that this will key in as a completed pass before you indicate that there was a goal. If the pass that you keyed in did not go into the endzone, the goal button will be disabled. You will have to undo the pass and make sure that you touch the end zone. If you indicate that a pass was complete in the attacking end zone and then key in another pass, the previous pass will be assumed to have ended up on the goal line (e.g. the receiver caught the pass and ran into the end zone). If a goal is keyed (for either team), the interface will return to the point setup screen. You may use the undo button to undo a pass and return to the point until you set up the next point.
Miscellaneous
- Timeouts - Events > Our timeout/Their timeout. Either team may call a timeout at the beginning of a point, before any other events are keyed. After any events are keyed, only the team on offense may call a timeout.
- Injuries - Events > Sub. Any substitution may be handled through this interface.
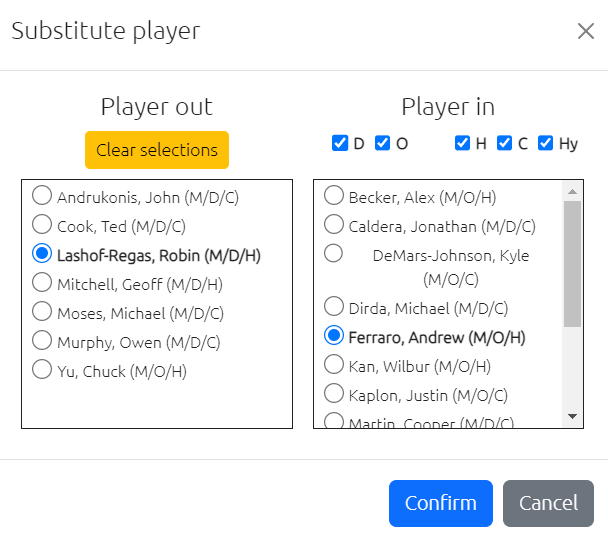
The substitution interface
Select the player leaving the game and the player entering. You may have fewer than the normal number (7 in most formats) of known players on the field (you may sub out a player without putting a new one in), but you may not have extra players on the field. Additionally, in mixed formats, the player leaving the field must be of the same gender match as the one entering the game.
Ending a game
The game will automatically end when the target score is reached. Alternatively, if time cap is reached, or the game ends before the target score for any other reason, you may, in the point setup screen, click the "End Game" button to manually end the game.
Viewing stats
To view your team's stats, navigate to my stuff and click the "Stats" tab. Select your team name from the drop down, and the set of tournaments or games you wish to view stats for.
Basic stats
Basic stats such as touches, completion percentage, goals, assists, and turnovers, are available with all memberships - free and paid.
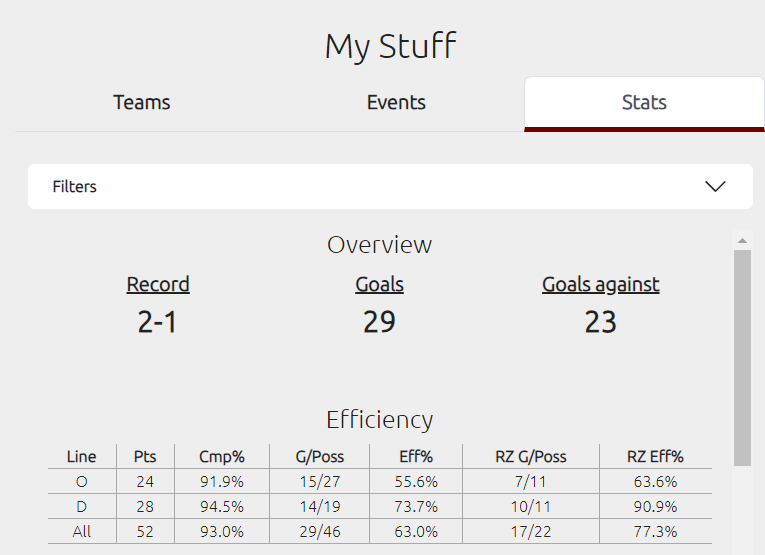
Overview and efficiency
Efficiency stats
- Line - Whether points were offensive or defensive. This is only determined by whether your team received the pull on that point, and not by the players on the field.
- Pts - Total points played
- Cmp% - Completion percentage
- G/Poss - Goals/Possessions
- Eff% - Efficiency. The percentage of offensive possessions ending in a goal for your team
- RZ G/Poss - Red zone goals/possessions. A red zone possession is defined as a possession where your team possessed the disc inside the opposing brick mark.
- RZ Eff% - Red zone efficiency - percentage of offensive red zone possessions ending in a goal for your team
Team leaders - view the team's leaders (or a full list) in a particular stat (and related peripheral stats).
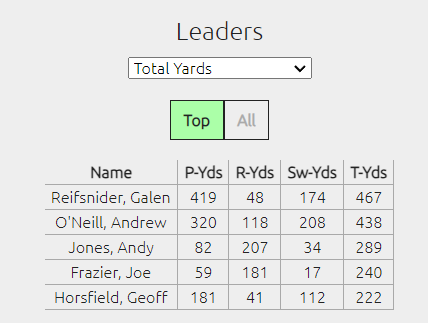
Team leaders
- Points played (plus point diff, percentage of on-field points scored)
- Goals
- Assists
- Blocks
- Completion % (plus points played, completions, and attempts)
- Passing Yards
- Receiving Yards
- Total Yards (plus passing yards, receiving yards, and swing yards)
- Touches
- Fewest Turnovers (plus points, touches, and touches/turnover)
- Touches per turnover (plus touches and turnovers)
- +/- (plus goals, assists, blocks, and turovers)
- Point differential (plus O points, D points, total points, and score %)
- Score % (plus points played and point differential)
Graphical reports (➕)
Several graphical reports are currently available for plus subscribers, and they are described below. They are all in a single carousel, and you may scroll through them using the arrow buttons on either side.
As a side note, your developer is not a statistician, but he is a quick study and if you have any suggestions for new reports to incorporate, he is all ears. Use the contact page to send him a message to suggest a new feature (or for compliments or complaints).
-
Field usage - where touches happen on the field. Use the buttons to toggle viewing completed passes, drops, throwaways, and stalls.
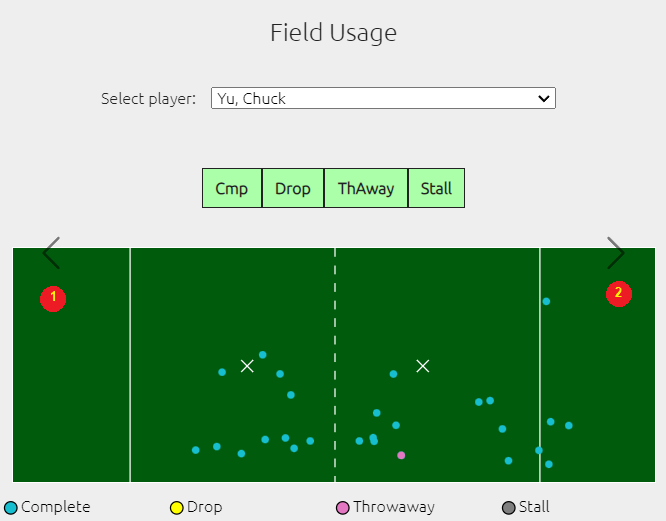
Graphical reports. Use the arrows on the sides (1, 2) to scroll through the graphics.
-
Passing chart - where players tend to throw the disc (and their success rates), or where players tend to receive the disc. Select a single player to view individual charts.
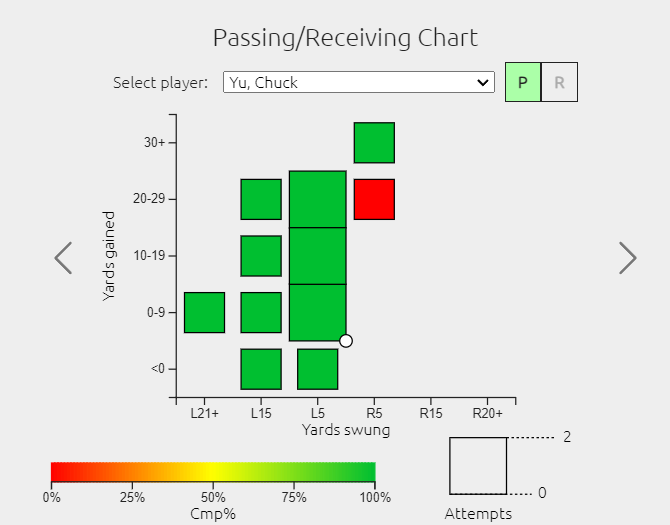
Passing chart - Chuck Yu tends to throw the disc more to his backhand side.
-
Connections - which players tend to connect with each other. Select a single player or a preset line to filter.
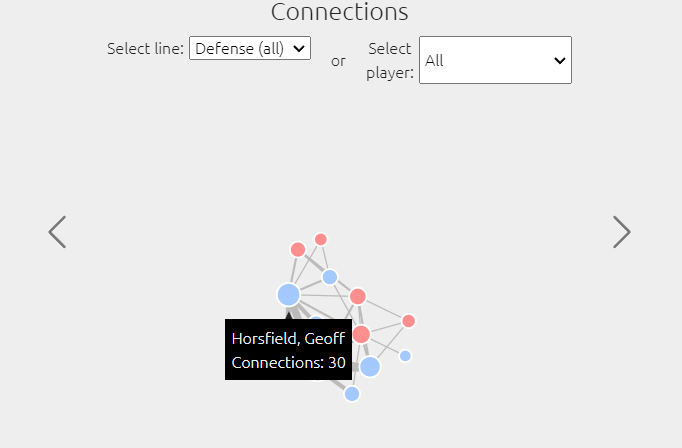
Connections graph